Macromedia Dreamweaver is one of the editors as well as web development tools that are quite famous now. Why? Mainly because of the ease and range of facilities to simplify web application developers in their work. The concept of what you see what you can also provide comfort especially for the newly sampled world wide web (site). Macromedia Dreamweaver really facilitate use with various facilities, including in connection with the programming language PHP and the MySQL database.
In this tutorial will be delivered on so easily create applications based on PHP and MySQL with the help of Macromedia Dreamweaver. Simply click, Finish. We will create applications that display, to post, edit and delete student data. Simple indeed, but not something that is complicated is also derived from the simple things?
Instead of curiosity, let's get started only.
Instead of curiosity, let's get started only.
Things that are needed in this tutorial:
- On the computer you use is already installed PHP, Apache, MySQL and Macromedia Dreamweaver because in this tutorial we will use four software.
- You know how to log into the MySQL user and password information below may be used.
- You've made a Site Definition in Dreamweaver, here's how to collaborate Dreamweaver with PHP-MySQL.
- You have enough to understand how to create databases, create and manipulate tables in MySQL either via console or with front-end like PHPMyAdmin and MySQLFront.
- You have enough to understand some basic SQL commands (DDL, DML).
The first step in creating web applications based on PHP and MySQL using Dreamweaver is preparing a database and tables that will be used. In this tutorial will use MySQL DBMS. This tutorial is just an example how to make the entry process, edit, delete and look into the MySQL database with the help of Macromedia Dreamweaver. However, if you already understand this tutorial well, for more complex applications are not much different.
The first time you create a database in MySQL with dbmahasiswa name. Next create a table in MySQL with the name of the MHS and the specifications as follows:
+----------+-------------+------+-----+---------+-------+
| Field    | Type        | Null | Key | Default | Extra |
+----------+-------------+------+-----+---------+-------+
| nim      | varchar(10) | NO   | PRI |         |       |
| nama     | varchar(30) | NO   |     |         |       |
| alamat   | text        | NO   |     |         |       |
| tgllahir | date        | NO   |     |         |       |
+----------+-------------+------+-----+---------+-------+
Making a Connection to MySQL in Dreamweaver Next we'll connect your PHP with MySQL utilizing the tools already available in Macromedia Dreamweaver. Do not forget to make sure that the Site Definition in Dreamweaver have been made correctly, because the success of the connection to MySQL is also dependent of the site definition.Here are the steps:
- Create a file named input_mhs.php as a page to enter new student data.
- Activate (open) Application panel which is located on the side of the Dreamweaver main window (see picture)
- Open the Databases tab on the Application panel.
- Click the [+] contained in the Databases tab and select MySQL Connection sub-menu.
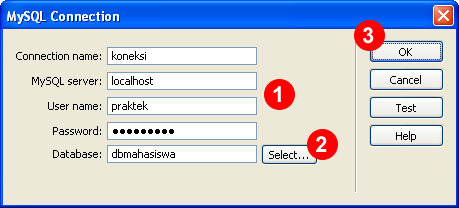
- Window will display the contents MySQL Connection (see picture). Fill in the name of the connection, mysql host, username, and password with the correct MySQL (1), then click the Select ... button to select the database to be used (2) and click the OK button (3) to store the MySQL connection configuration.
- If the connection succeeds then the Databases tab in the Application panel will display information on the following database tables contained in the database. (see picture)

Making page to Student Data Input
After connecting to the MySQL database is successful, then the next we'll make a page to input student data into the MySQL database. Basically to make data input applications, we must create a form input in advance. But with the help of Macromedia Dreamweaver, we will utilize the facilities already available, so no need to create a form in advance.
Here are the steps:
- Create a file named input_mhs.php as a page to enter new student data (if already made, do not need to be made again).
- Enable the Application on the top menu, then select Record Insertion Form Wizard menu (see picture). Or it could access the menu Insert> Application Objects> Insert Record> Record Insertion Form Wizard.
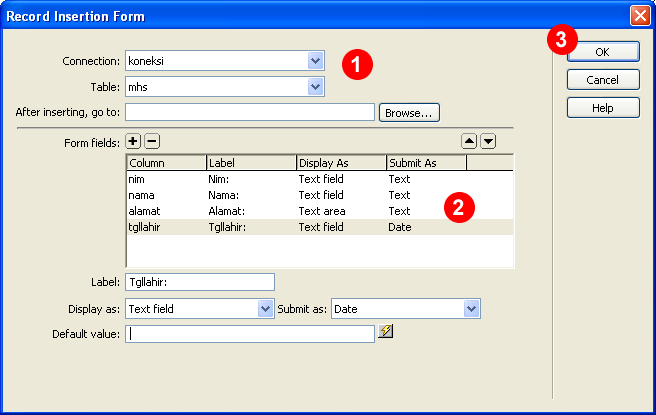
- Will appear Record Insertion Form window. Specify your connection, which is used and set the table display form (input type). Press the OK button. See picture.
- On the page will display the form input to student data (see figure). Press F12 (Preview in Browser) for trying to student data input page.

Creating Pages for Displaying Student Data
To create a page that displays data from the database, in this case the student data, is easy enough. To be sure before proceeding, we must make sure again that the connection to MySQL has been made correctly (see way above). To display data from the database, first we have to do is create a Recordset, and then after the recordset is made we live determines the data would be displayed in tabular form or another. In this tutorial, we will display the data in table form.
Here are the steps:
- Create a file named tampil_mhs.php to display student data.
- Open the Application section and select the menu Recordset (or can access it via the menu Insert> Application Objects> Recordset). See picture!
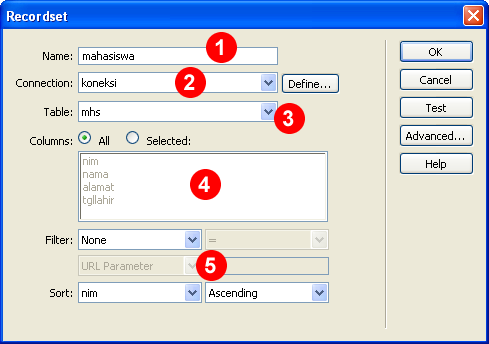
- Recordset window will appear (see picture below). Specify the name Recordsetnya (1), the connection used (2), the table will be displayed (3), fields to show (4) and the desired filter and sorting (5). Press the OK button to continue. We also can press the Test button to make sure everything is correct.
- Further will be displayed information window if the Recordset was successfully added. Click OK to continue
- From the menubar Application, Select Dynamic Data icon and select the Dynamic Table (see picture). Or can also be done from the menu Insert> Application Objects> Dynamic Data> Dynamic Table.
- Dynamic Table window will appear. Select the name of the Recordset to be displayed, the number of records to be displayed and several table settings. Click OK to continue. See picture
- On the page will display a table, the first line is the header, the second line is the data (records) from a database (images). Press F12 (Preview in Browser) for trying to show page student data.

Continue to section 2 (Edit and Delete data)
Reference :
http://achmatim.net/2008/12/22/dreamweaver-php-dan-mysql-untuk-aplikasi-data-mahasiswa/


0 comments on Dreamweaver, PHP and MySQL for Student Data Applications :
Post a Comment and Don't Spam!
Dont Spam please