This section is a continuation of previous articles that discuss about how to make PHP-MySQL based applications using Dreamweaver. In this article will be discussed on the page to Edit and Delete student data. Hopefully this tutorial is useful for us all.
Creating Pages for Editing Student Data
Edit page is basically the same data as the data input page, only on the edit page of data, data to be edited (changed) has been shown first in the form. Before you create a form to edit data, first thing to do is determine which students will be edited. In web-based applications, to determine which students will want to edit a variety of way. In this tutorial will try the simplest way (and many do well), namely by adding the edit link student data table so that when clicked will send the parameters to be NIM student edit page student.
Edit page is basically the same data as the data input page, only on the edit page of data, data to be edited (changed) has been shown first in the form. Before you create a form to edit data, first thing to do is determine which students will be edited. In web-based applications, to determine which students will want to edit a variety of way. In this tutorial will try the simplest way (and many do well), namely by adding the edit link student data table so that when clicked will send the parameters to be NIM student edit page student.
things that needs to do the data on this tutorial :
Part 1
- First we create a first page "edit_mhs.php".
- Then open the page tampil_mhs.php that was made at the previous tutorials. Then we add a new column in the student data table and create a link to edit. To create a new column in the table, it can block out the last column of the table and choose Modify> Table> Insert Rows or Columns ... Then in the window that appears select the Column, the number of columns that will be displayed and position the new column (see picture). Select (select) the text "edit" in the column recently created and create hyperlinks with menu Insert> Hyperlink. Next will come the Hyperlink window. Select the Browse button (4) (See Figure)
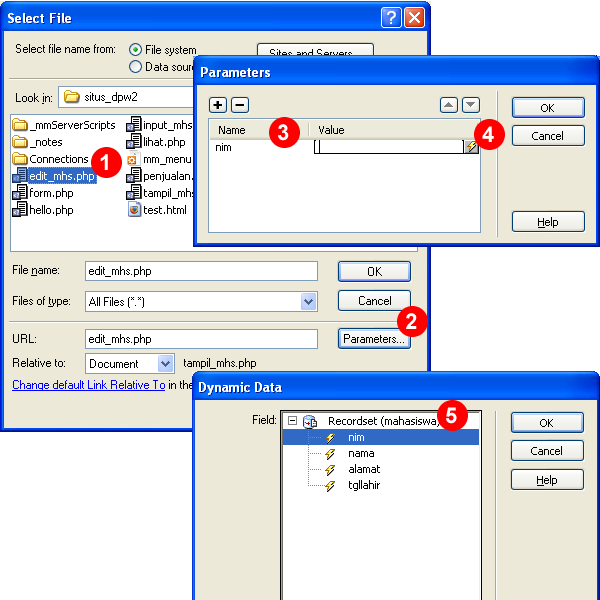
- In the Select Files window that is displayed, select the page edit_mhs.php (1) which previously has been created as a page to edit student data. Then click the Parameters .. (2) and will be displayed the Parameters window ... (See picture below)
- In the Parameters window .. contents of the parameter name that will be sent (NIM) in the name and then in the value (2) Dynamic Data button (picture of lightning). See the picture below
- Dynamic Data window will appear. Select the fields that will be the value parameter (in this case we will use the NIM). Click OK to continue.
- Click OK
- Save Changes

Part 2
Following a link to the edit page is created, we now make the edit page of students:- Open edit_mhs.php pages that have been created in step 1 section 1 above.
- Because the data in the edit form we will show first the old data to be edited, then we must create a Recordset. Select the menu Insert> Application Objects> Recordset.
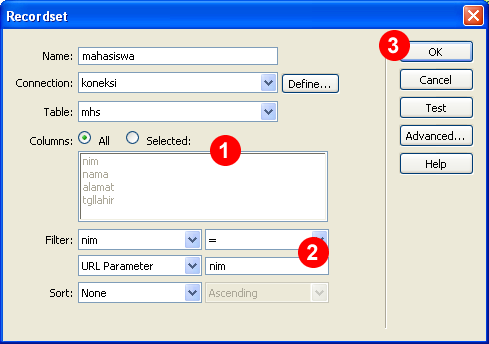
- In the Recordset window, set the name of the recordset, connection, table and fields that will be taken. We will take students based on the values of data that is sent from the NIM parameters tampil_mhs.php page (see steps 2-5 of Section 1 above).Set filter on Recordset window (2) where the first column is the name of the fields that will be filtered, the second column is the comparison operator is used, the third column is the type (method) taking of value, we select a URL parameter, and the fourth column is written the name parameter or the form . NIM Type in this section because in the previous step (see step 5 part 1) we set the parameter name is NIM. Click OK to save the settings and the Recordset is created. See the picture below.
- Then, from the Application menu, select the Record Update Form Wizard. Or by accessing the menu Insert> Application Objects> Update Record> Record Update Form Wizard. See picture
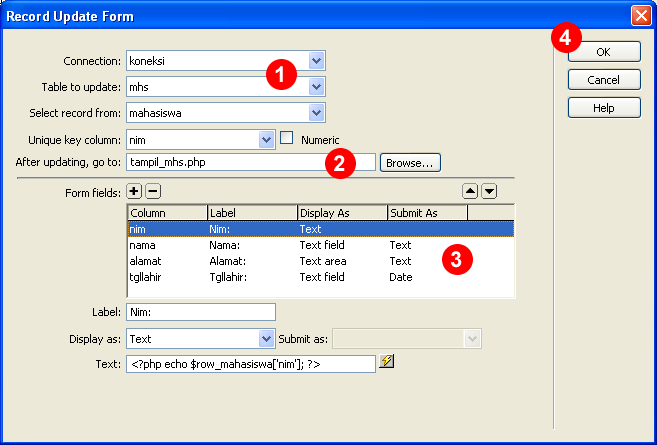
- It would appear Record Update Form. Set the connection, the table is used, the name of the recordset for the data to be edited (step 10 section 2), select the page will be displayed after the update succeeded (2), set the input type and label (3). If has already been set correctly, click OK to continue. See the picture below
- It will display the edit form data in Dreamweaver. To try editing, open the page in a browser tampil_mhs.php (F12) and click the edit link. See picture.


Making Page to Delete Student Data
As with any page to edit data, a page to remove the data are also generally begins from page views.
On page views provided "delete link" which when click it will delete the student to a page by sending a parameter (NIM).
Let us follow the steps to create a page delete data.
Let us follow the steps to create a page delete data.
- Create a new page with the name hapus_mhs.php.
- Follow steps 2-7 in section-1 to edit the data above, it's just adapted address link to the page hapus_mhs.php.
- If you delete the link in the page tampil_mhs.php already made, we then we turn to page hapus_mhs.php.
- Further from the Application menu, select Delete Record. Or by accessing the menu Insert> Application Objects> Delete Record.
- Delete Record window will appear (see picture). In that window, set (1) types of variables that will be determinant delete process is executed or not, (2) connection and table name is used, (3) column which is used as the primary key in the database along with its value, (4) page that is displayed if the student successfully removed.
- Click the OK button (5) to close the window and save the settings.
- To try to delete the process, open the page in a browser tampil_mhs.php (F12) and click the delete button.
- OK.


0 comments on Dreamweaver, PHP and MySQL for Student Data Application (Part 2) :
Post a Comment and Don't Spam!
Dont Spam please